How to Build a Fully Responsive and Functional Calculator Using TailwindCSS and JavaScript


A Calculator, by definition, is something used for making mathematical calculations, in particular a small electronic device with a keyboard and a visual display. This calculation ranges from basic operations like addition, subtraction, division and multiplication, to complex mathematical operations like cosine, sine functions, and logarithmic functions too.
With the evolvement of tech, we can now build calculators and use them right in our browsers.
In this tutorial, we will be building a basic calculator that we can use right in our browser.
Understanding the task
The calculator we will be building will be able to make basic operations like addition, subtraction, division and also multiplication. We will divide our work into 2 parts, Frontend (the UI of the calculator) and the Logic (Using Javascript)
Structure of Code
Our code will be divided into 2 parts. The frontend( implemented using HTML and TailwindCSS) and the Logic (Using JavaScript)
Without taking too much time, let's do this.
Frontend (HTML and TailwindCSS)
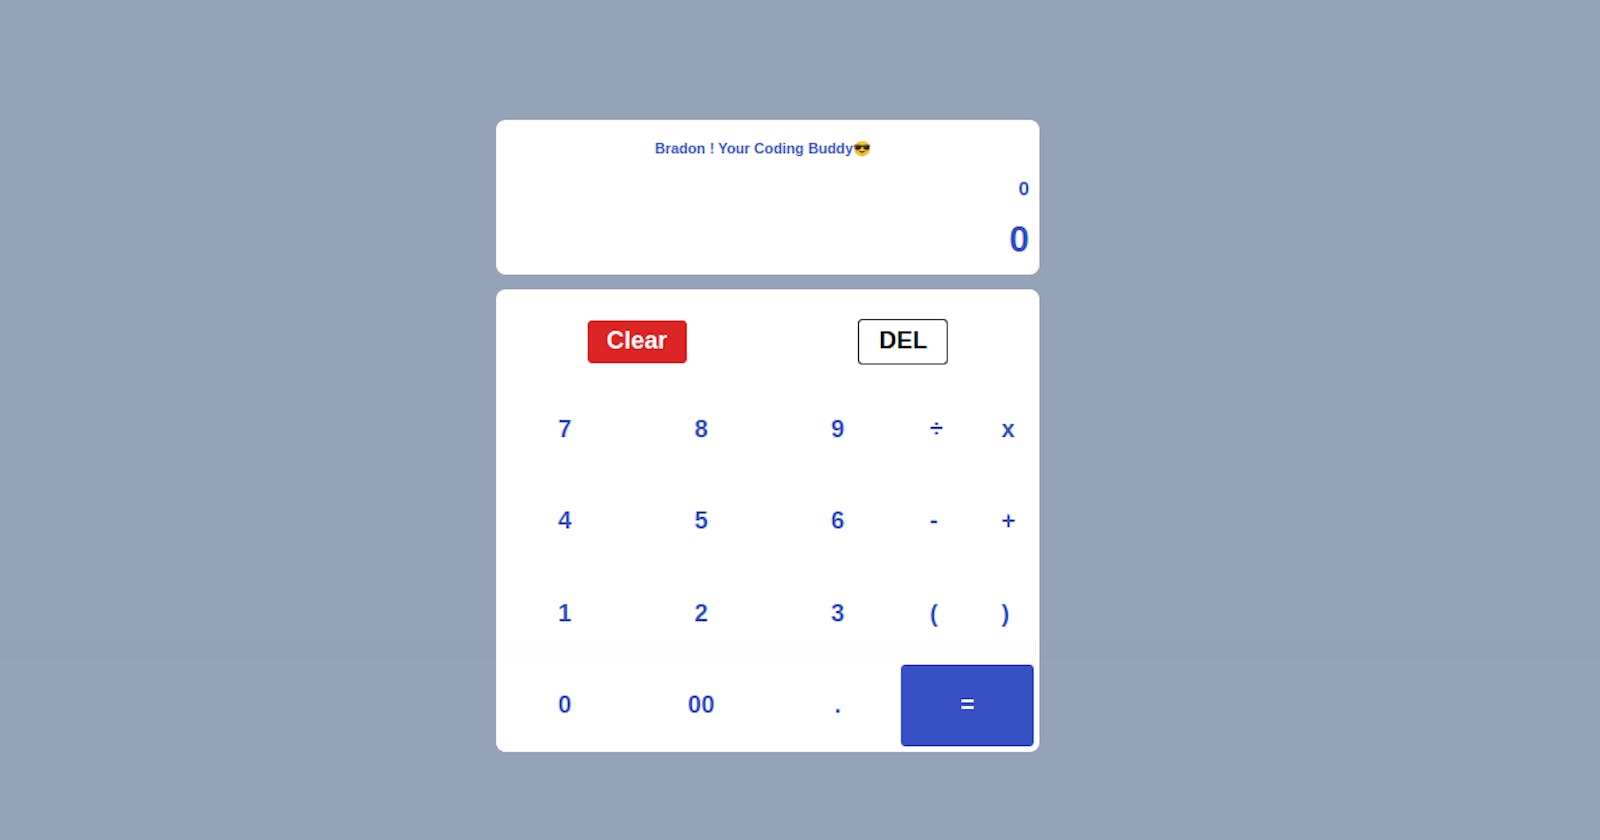
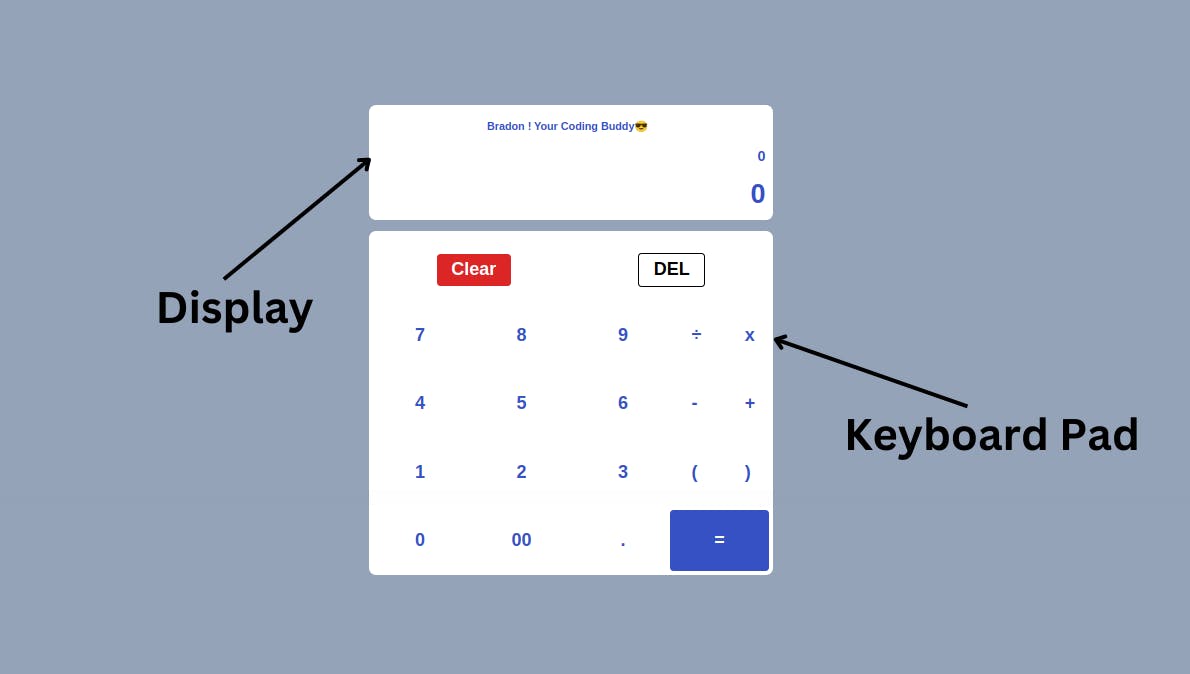
For the UI, we will simply divide it into 2 sections, the display screen, then the keyboard pad.
Here is what the code looks like,
<body class="bg-slate-400 text-[#3651c4] flex items-center justify-center min-h-screen">
   <main class="w-full max-w-md select-none px-4 md:px-0">

    <div class="flex flex-col items-center gap-3 font-bold">
            <!-- Display Screen -->
       <div class="w-full h-28 sm:h-32 bg-white rounded-lg mt-5 md:mt-0 flex flex-col justify-evenly items-end pr-2">
          <div class="place-self-center py-1 text-xs md:text[1rem]">Bradon ! Your Coding Buddy😎</div>
             <div id="previous-operation"></div>

             <div id="current-operation"  class=" text-2xl md:text-3xl font-semibold" ></div>
         </div>
                    <!-- Keyboard pad container -->
  <div class="bg-white text-xl w-full p-1 rounded-lg">
                    <!-- Clear and DEL-->
    <div class="flex justify-around items-center my-5 [&>*]:px-4 [&>*]:py-1 [&>*]:rounded [&>*:active]:scale-95">
      <button id="clear" class="text-white bg-red-600">Clear</button>
      <button id="delete" class="border border-black text-black">DEL</button>
    </div>

    <div class="grid grid-cols-12">
                    <!-- Numeric pad -->
     <div class="number col-span-9 grid grid-cols-3 gap-2 [&>*:hover]:bg-blue-900 [&>*]:rounded [&>*:hover]:text-white [&>*:active]:scale-90">

           <button data-number>7</button>
           <button data-number>8</button>
           <button data-number>9</button>
           <button data-number>4</button>
           <button data-number>5</button>
           <button data-number>6</button>
           <button data-number>1</button>
           <button data-number>2</button>
           <button data-number>3</button>
           <button data-number>0</button>
           <button data-number>00</button>
           <button data-number>.</button>
    </div>
                    <!-- Symbols-->
    <div class="basic-operations col-span-3 grid grid-cols-2 [&>*]:py-5 [&>*]:px-2.5 [&>*]:sm:px-6 gap-2 [&>*:hover]:bg-blue-900 [&>*]:rounded [&>*:hover]:text-white [&>*:active]:scale-90">

           <button data-operation="/">÷</button>
           <button data-operation="*">x</button>
           <button data-operation="-">-</button>
           <button data-operation="+">+</button>
           <button data-bracket>(</button>
           <button data-bracket>)</button>
           <button id="equal" class="col-span-2 bg-[#3651c4] text-white">=</button>
     </div>

   </div>
  </div>

</div>

</main>

    <script src="./main.js"></script>
</body>
- Display Screen
<div class="w-full h-28 sm:h-32 bg-white rounded-lg mt-5 md:mt-0 flex flex-col justify-evenly items-end pr-2">
          <div class="place-self-center py-1 text-xs md:text[1rem]">Bradon ! Your Coding Buddy😎</div>
             <div id="previous-operation"></div>

             <div id="current-operation"  class=" text-2xl md:text-3xl font-semibold" ></div>
</div>
The display screen is a container (Flex container) with the flex-direction of flex-col a width of w-full and a flexible height of h-28 on the mobile screen and sm:h-32 from small screens and above.
Within the container, we have two principal divs, and these two divs have ids, we have one div with id="previous-operation", and the other has an id="current-operation".
The container with the id="previous-operation", is responsible to display the different inputs down by the user, while the one with the id="current-operation" is responsible to display the result of the computation
Since the container with id="current-operation" is responsible for displaying results, we gave its text content a font-size of text-2xl on mobile screens, and a text-3xl from medium screens and above
That's pretty much it for the display screen.
- Keyboard pad
<div class="bg-white text-xl w-full p-1 rounded-lg">
                    <!-- Clear and DEL-->
    <div class="flex justify-around items-center my-5 [&>*]:px-4 [&>*]:py-1 [&>*]:rounded [&>*:active]:scale-95">
      <button id="clear" class="text-white bg-red-600">Clear</button>
      <button id="delete" class="border border-black text-black">DEL</button>
    </div>

    <div class="grid grid-cols-12">
                    <!-- Numeric pad -->
     <div class="number col-span-9 grid grid-cols-3 gap-2 [&>*:hover]:bg-blue-900 [&>*]:rounded [&>*:hover]:text-white [&>*:active]:scale-90">

           <button data-number>7</button>
           <button data-number>8</button>
           <button data-number>9</button>
           <button data-number>4</button>
           <button data-number>5</button>
           <button data-number>6</button>
           <button data-number>1</button>
           <button data-number>2</button>
           <button data-number>3</button>
           <button data-number>0</button>
           <button data-number>00</button>
           <button data-number>.</button>
    </div>
                    <!-- Symbols-->
    <div class="basic-operations col-span-3 grid grid-cols-2 [&>*]:py-5 [&>*]:px-2.5 [&>*]:sm:px-6 gap-2 [&>*:hover]:bg-blue-900 [&>*]:rounded [&>*:hover]:text-white [&>*:active]:scale-90">

           <button data-operation="/">÷</button>
           <button data-operation="*">x</button>
           <button data-operation="-">-</button>
           <button data-operation="+">+</button>
           <button data-bracket>(</button>
           <button data-bracket>)</button>
           <button id="equal" class="col-span-2 bg-[#3651c4] text-white">=</button>
     </div>

   </div>
  </div>
Essentially, we demarcated different parts in this section, we have the Clear and DEL, Numeric pad, and lastly, we have the Symbols
- Clear and DEL
<div class="flex justify-around items-center my-5 [&>*]:px-4 [&>*]:py-1 [&>*]:rounded [&>*:active]:scale-95">
      <button id="clear" class="text-white bg-red-600">Clear</button>
      <button id="delete" class="border border-black text-black">DEL</button>
</div>
It is two buttons, with ids describing their functions, that's id="clear" for Clear and id="delete" for DEL
We gave them some common styling using the [&>*] property from TailwindCSS.
If you are used to my posts, by now you surely know the meaning of [&>*] in tailwindcss.
But if you are new, The property [&>*] simply means “select each child individually”, this allows us to apply the same styling properties to all the immediate children.
For each of the buttons, we gave them a padding-inline of px-4 padding-block of py-1 a border-radius of rounded, and we also gave a clicking effect using [&>*:active]:scale-95
- Numeric Pad
                    <!-- Numeric pad -->
<div class="number col-span-9 grid grid-cols-3 gap-2 [&>*:hover]:bg-blue-900 [&>*]:rounded [&>*:hover]:text-white [&>*:active]:scale-90">

           <button data-number>7</button>
           <button data-number>8</button>
           <button data-number>9</button>
           <button data-number>4</button>
           <button data-number>5</button>
           <button data-number>6</button>
           <button data-number>1</button>
           <button data-number>2</button>
           <button data-number>3</button>
           <button data-number>0</button>
           <button data-number>00</button>
           <button data-number>.</button>
</div>
we use a similar approach to the Clear and DEL section to give some styling to the numeric pad. We gave them individual background-color of bg-blue-900 a border-radius of rounded and clicking effect using active:scale-90
It is worth saying that the main container in which this numeric pad and symbol are found, was made a grid container, with 12 columns using grid grid-cols-12
And we gave 9 columns to the numeric pad (You can see col-span-9 ) and gave 3 columns to the symbol section.
- Symbol
                   <!-- Symbols-->
    <div class="basic-operations col-span-3 grid grid-cols-2 [&>*]:py-5 [&>*]:px-2.5 [&>*]:sm:px-6 gap-2 [&>*:hover]:bg-blue-900 [&>*]:rounded [&>*:hover]:text-white [&>*:active]:scale-90">

           <button data-operation="/">÷</button>
           <button data-operation="*">x</button>
           <button data-operation="-">-</button>
           <button data-operation="+">+</button>
           <button data-bracket>(</button>
           <button data-bracket>)</button>
           <button id="equal" class="col-span-2 bg-[#3651c4] text-white">=</button>
     </div>
Nothing much to say here right, all the styles applied here were initially used in the other sections.
Logic (JavaScript)
To make our calculator functional on the web, we made use of the Javascript programming language.
I choose the one-class approach, Creating a class, with various methods, that perform different functions per the need.
class Computation {

    constructor (previousOperation, currentOperation){
        this.previousOperation = previousOperation;
        this.currentOperation = currentOperation;
        this.clear()
    }

  clear(){
    previousOperation.innerText = '0'
    currentOperation.innerText = '0'
}

  updateDisplay(value){

    if (previousOperation.innerText === '0')
         previousOperation.innerText = value.toString()
    else
    previousOperation.innerText = previousOperation.innerText.toString() + value.toString()


  }

  delete(){
    previousOperation.innerText = previousOperation.innerText.slice(0, -1)

  }

  result(){
    let result = previousOperation.innerText.split('')
    let cleanResult = result.map(number => {


       if (number === 'x'){
         return '*'
       }
       if(number === '÷') return '/'
        else return number;

    });
    result = cleanResult.join('')
    console.log(eval(result))
    currentOperation.innerText = eval(result)
  }

}

const numbers = document.querySelectorAll('[data-number]')
const operation = document.querySelectorAll('[data-operation]')
const bracket = document.querySelectorAll('[data-bracket]')
const specialOperation = document.querySelectorAll('[data-special-operation]')
const deleteButton = document.getElementById('delete')
const equal = document.getElementById('equal')
const clear = document.getElementById('clear')
const previousOperation = document.getElementById('previous-operation')
const currentOperation= document.getElementById('current-operation')


const computation = new Computation (previousOperation, currentOperation)


numbers.forEach(button => {

    button.addEventListener('click', ()=>{
        let value = button.innerText
        console.log(value);
        computation.updateDisplay(value);
    })

})

operation.forEach(button =>{

    button.addEventListener('click', ()=>{
     let  operant = button.innerText
     computation.updateDisplay(operant)
    })

})

deleteButton.addEventListener ('click', ()=> {
    computation.delete()
})

equal.addEventListener('click', ()=>{
    computation.result()
})

clear.addEventListener('click', ()=>{
  computation.clear()
})

bracket.forEach(button => {
  button.addEventListener('click', ()=>{
    let brackets = button.innerText
    computation.updateDisplay(brackets)
  })
})
Our big class is called Computation, this class has various methods, namely
clear(): To clear and reset the previous-operation and current-operation to zero
updateDisplay(): As the name implies, it is responsible for updating the content of the previous-operation and current-operation.
delete(): Helps to delete the last input at the level of previous-operation
result(): performs all the required operations, then passes its result pt updateDisplay() to update the current-operation content.
We made use of the eval() javascript function to ease our calculations.
You might want to read more about the eval() method in Javascript
After our class Computation, we did some declarations, we referenced all the different ids and attributes in the HTML to some constants in the Javascript file, then when forward to add event listeners to each button and pass the appropriate method to them for appropriate computation.
And that's pretty much it for this tutorial
Conclusion
We just built a fully responsive, beautiful and functional Basic Web calculator.
It is definitely something you can add to your portfolio or your next project that may need some calculations.
You can have a live preview on Codepen and have the source code on GitHub
Don’t hesitate to share with me if you were able to complete the tutorial on your end, I’d be happy to see any additional components and styling you added to your Countdown.
If you have any worries or suggestions, don’t hesitate to bring them up! 😊
See ya! 👋